Creating a New Template
Learn how to create a new WhatsApp message template for your business.
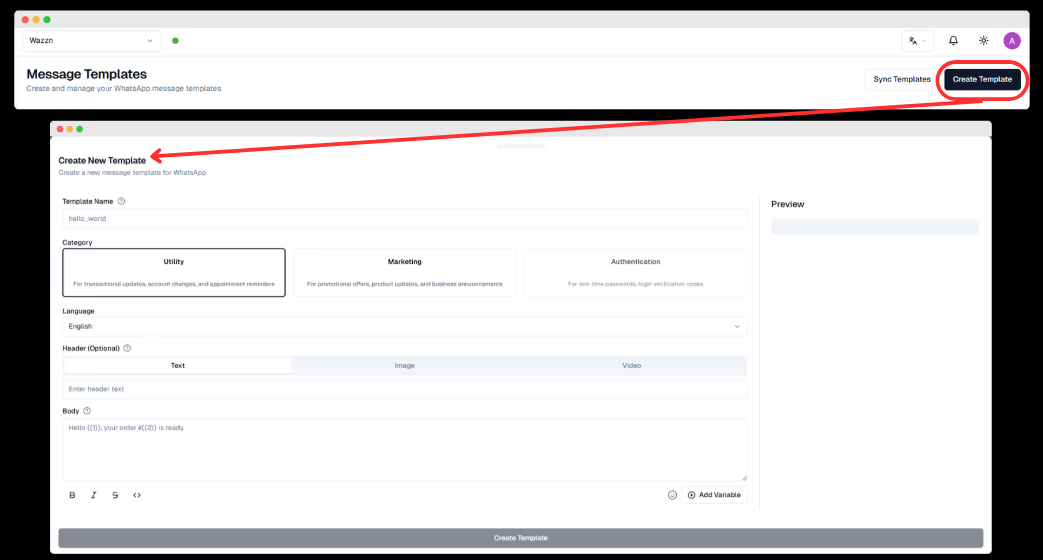
When you click on “Create Template”, a form will appear, allowing you to set up a new WhatsApp Business message template. This template must be submitted for approval before use, crucial for WhatsApp marketing and WhatsApp customer support. Below are the key steps to follow:

Step 1: Enter Template Name
-
The template name must be written in lowercase English letters.
-
Avoid using spaces or special characters (use underscores
_instead).
Example names:
-
order_confirmation -
payment_reminder -
account_verification

Step 2: Choose a Category
Each template must belong to a category that defines its purpose. WhatsApp provides three main categories:
-
Utility
-
Used for important customer notifications and updates in WhatsApp Business.
-
Examples:
-
Order confirmations
-
Payment reminders
-
Appointment reminders
-
-
-
Marketing
-
Used for promotional messages, offers, and campaigns in WhatsApp marketing.
-
Examples:
-
Discounts and special offers
-
Product updates
-
Loyalty program messages
-
-
-
Authentication
- Used for security and login-related messages, supporting WhatsApp Business automation.
-
Examples:
-
One-Time Passwords (OTPs)
-
Two-factor authentication codes
-

Step 3: Select a Language
-
Choose the language in which the template will be sent to enhance WhatsApp customer engagement.
-
If you need the template in multiple languages, you must create separate versions for each.

Step 4: Add a Header (Optional)
The header is optional and appears at the top of the message. You can choose from:
-
Text – A short text-based header (e.g., "Order Update" or "Reminder").
-
Image – A visual header such as a product image or company logo (Max: 2MB).
-
Video – A short video that adds more context to the message (Max: 16MB).

3. Adding the Message Content
Body (Main Message Content)
This is where you write the main content of your message. It should be:
-
Clear and concise for better WhatsApp marketing results.
-
Aligned with WhatsApp’s messaging guidelines.
-
Free from spammy or misleading content to comply with WhatsApp Business standards.
Using Variables in the Message
WhatsApp allows you to add dynamic variables to personalize messages in WhatsApp marketing campaigns. Variables are placeholders that get replaced with actual customer data when the message is sent.
Example:
Message with Variables:
📦 Hello {{1}}, your order #{{2}} has been shipped and will arrive by {{3}}.
How it appears to the customer:
📦 Hello Sarah, your order #12345 has been shipped and will arrive by Feb 25.
To add a variable, use curly brackets {{ }} and a number inside. The number corresponds to a dynamic value that will be inserted when sending the message.

4. Footer (Optional)
-
The footer is a small text section at the bottom of the message.
-
It is optional and can be left blank.
-
Typically used for:
-
Business disclaimers
-
Contact information
-
Terms and conditions
-
Example footer:
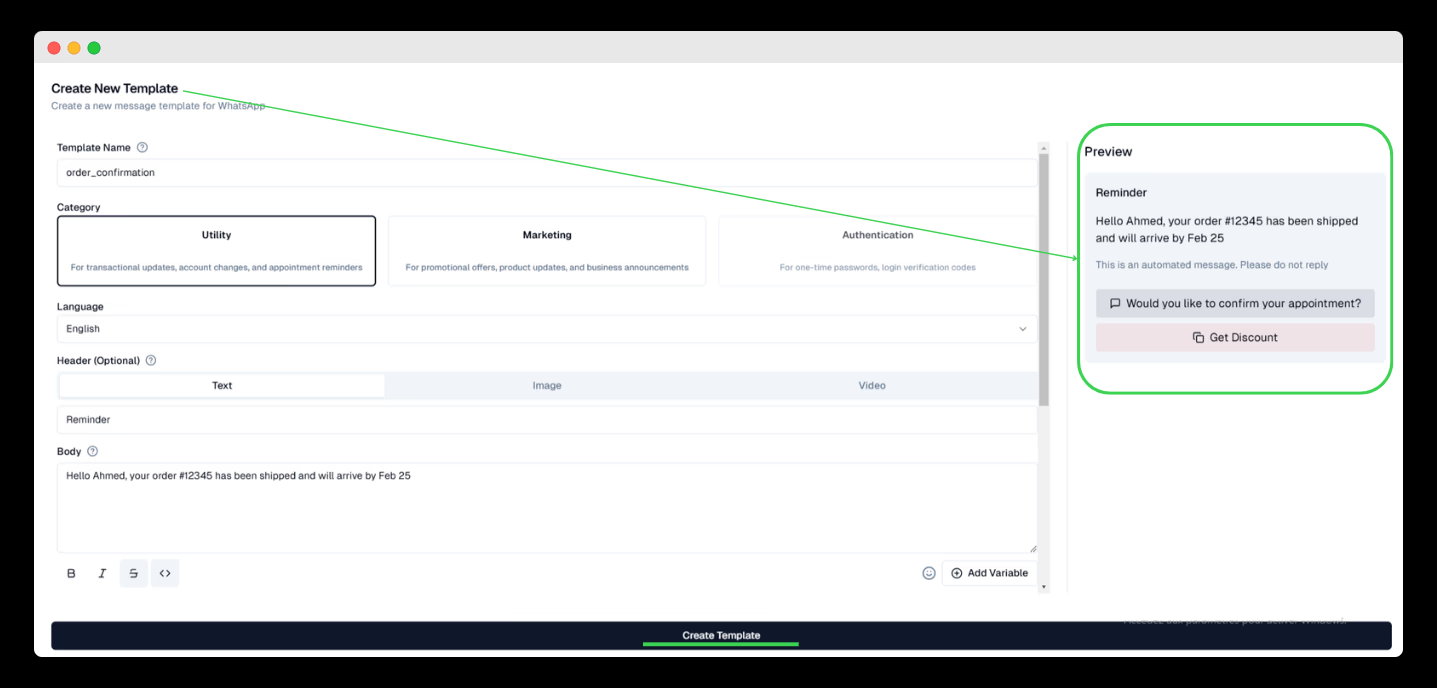
"This is an automated message. Please do not reply."

5. Buttons (Optional)
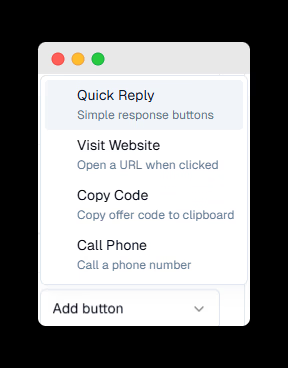
You can add interactive buttons to make it easier for users to take action, enhancing WhatsApp customer interactions. There are four button types:

1. Quick Reply
-
Allows users to select from predefined responses.
-
Example:
-
Message: "Would you like to confirm your appointment?"
-
Quick reply options: Yes / No
-

2. Visit Website
-
Redirects users to a specific URL.
-
Two types:
-
Static URL – A fixed web address (e.g.,
www.yourwebsite.com). -
Dynamic URL – Includes variables (e.g.,
www.yourwebsite.com/order/{{1}}).
-
Example:
-
Button Text: "Track Order"
-
URL:
www.yourshop.com/order/{{1}}(will be replaced with actual order number)

3. Copy Code
-
Displays a promo code or discount code.
-
Example:
-
Button Text: "Get Discount"
-
Code:
WELCOME10(customer can copy this code).
-

4. Call Phone
-
Adds a button that allows users to directly call a specified phone number.
-
Example:
-
Button Text: "Call Support"
-
Phone Number:
+1 234 567 890
-

On the right side, you will see a preview of your message template, allowing you to review how it will appear to customers. Once you're satisfied with the content and formatting, click the "Create Template" button to finalize and save your template.

Important!
After clicking "Create Template", it's important to click "Sync Template" to ensure your template appears in your dashboard. You will see a pop-up confirmation saying "Success! Template synced successfully."
📌 Want to know where you can use templates? Click here.